The Sony Alpha Camera range is well known to deliver outstanding photography and video imaging technologies.
As a Sony Digital Imaging Advocate for Sony Australia, I am personally incredibly excited for the official announcement fo the Alpha 7S III supporting high resolution, high frame rate 4K 120P video.
For the experienced videographer, we know 4K 120P is essential technology to enable cinematic footage, but no matter what Alpha Camera you have - it's an incredible video tool in your hands. Stepping into the video realm is something that can be challenging but highly rewarding. Keeping this in mind, I have prepared a short summary on the basics of video on Sony Alpha Cameras.
Getting Started in Video
Depending on the Sony Alpha Camera you have, you will be able to video with different video resolutions up to 1080P Full HD or 4K Ultra High Definition at varying frame rates and bit rates.
To support high quality video capture, you will need a high speed memory card inserted into your camera. I would highly recommend at a minimum UHS-1 Memory Cards (i.e. Sandisk Extreme Pro).
Video Resolution
Generally speaking, the higher the video resolution, the sharper the video. Select the highest resolution video available.
- To enable the highest resolution select MENU > FILE FORMAT.
- If XAVC S 4K is available, that means your camera can shoot 4K Video. Select XAVC S 4K.
- If XAVC S 4K is not available, select XAVC S HD. This means your camera can shoot 1080P.
Frame Rate
Frame rate (FPS) determines the amount of "frames per second" in your video. If you are shooting fast paced action, or footage which might be slowed down after, choose a higher FPS.
- If you have selected XAVC S 4K, your camera will show you the highest frame rate it can shoot in 4K. This is 24p/25p for most current Sony Alpha Cameras whilst shooting 4K.
- If you have selected XAVC S, your camera will show you the frame rates it can film in. 24p/25p is suitable for general filming. 50p/60p will shoot twice the frames per second, letting you slow down the video in editing or providing a smoother video experience. I would recommend 50p/60p.
Bit Rate
Bit Rate determines the storage rate the video will record at. A higher bit rate will produce a higher quality video. Keep in mind higher bit rates take up more memory card space.
- If you are shooting in 4K, 4K 60M in camera provides a high quality enough bitrate for general use.
- 4K 100M is better at showing off details with less video compression, but keep in mind your memory card space.
I would recommend you choose the highest bitrate available, unless you are filming long concerts or videos where preserving memory card space is important.
Select the Video Mode
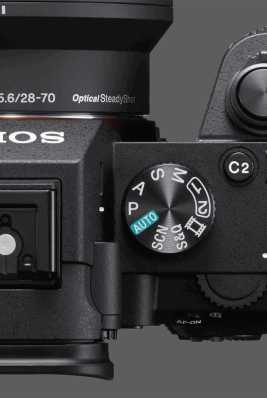
At the top of your camera, there is your function wheel (P, A, S, M, etc.). Scroll to the video (film) symbol. Your camera will be in the dedicated video mode.
In this mode, you can press the Fn button to open the quick menu. Select the Video Function button, and choose P for Program Auto Video if you are just getting started to video.
In Video Program Auto (P), Aperture Priority (A), Shutter Speed Priority (S) modes, you can use the Exposure Compensation Dial (Top Left) of the camera to adjust the exposure (brightness) of your video. Spin the dial to "0" (Normal Brightness) to start, and adjust it from there.
In Manual Video mode, the exposure compensation dial still works if your ISO is set to Auto. One you set the ISO to manual in Manual Video mode, the dial is invalid.
You're all setup to start filming! Hit the red video button to start recording.
Video Tips
Video is all about Storytelling
Unlike photography, videos provide continuous visual frames and audio tracks, that combine into a 'moving image' for consumers. Before videoing, think about how you would tell the story in a conversation. Paint a picture of where you are, who you're with and film the interesting little details. You can always edit this together in your video editing software later (post production).
Stabilise
No-one likes shaky video. If you plan on doing frequent video work, investing in a stabiliser is super important. Ensure the stabiliser is strong enough to hold the weight of your camera and lenses. Think closely about how you will move the camera and what angles you will use to tell the story.
If you are not using a stabiliser, hold the camera steady or use a tripod. Think about how you will show these shots to your audience.
Lighting
Lighting is crucial for high quality video. Ensure your subject is well lit, with even lighting to avoid flare ups or spotty lighting. You can try using a lamp or another light source. Remember generally speaking, the larger the light source, the softer the light. If a light source appears harsh, try diffusing it by reflecting it off a white wall or using a diffuser.
Most of all enjoy shooting your video!
This video guide introduction guide only, if you have any questions feel free to reach out to me on Instagram at @epgroupmelbourne or via our website at www.epgroup.co
Eric Peng
Digital Imaging Advocate, Sony Australia
Managing Director, EP Group Australia


